Installing ScriptX.Services
for On-Premise Devices
Requirements
-
Internet Information Services (IIS) 7.5 or later on Microsoft Windows on an Intel x64 (compatible) PC.
Other web servers and OSs are not supported.
When deploying to Windows Server 2012 and later the full Desktop GUI is required so that Internet Explorer is available. Note that Windows Server 1709 is not supported as it does not have the Desktop Experience.
-
.NET Framework 4.6.1 or later
-
ScriptX.Services License
In order to use ScriptX.Services for On-Premise Devices you will require a license. To evaluate ScriptX.Services for On-Premise Devices please order a license for your server. The license will be valid for 60 days to enable you to fully evaluate the functionality.
To complete the license order you will need the name of the computer(s) on which you which you wish to install the ScriptX.Services for On-Premise Devices - this is the "Computer name" shown in Control Panel System Properties or "PC Name" shown in Settings | About.
Please visit ScriptX.Services Pricing and Licensing to order a license.
Introduction
For illustration this article shows a walk-through of installation on Windows Server 2016. If you have a small workgroup of devices to who you wish to provide print services and have spare processing capacity on a Windows 10 PC then please see How to install ScriptX.Services for On-Premise Devices on Windows 10.
ScriptX.Services for On-premise Devices has two parts:
- A web application hosted in IIS (IIS Worker Process) that provides the REST API to be called by clients to perform printing and provides a dashboard for configuration and testing of ScriptX.Services. The application is implemented with ASP.NET Framework v4.6.1.
- The ScriptX Print Server - a COM based server (MeadCo ScriptX Broker/Host) that provides the pagination and printing service that is called by the REST API.
Each runs in its own process; both should run under the same account.
It is strongly recommended that a new account (ScriptXPrint) is used for this rather than using a built in account or virtual account (such as the IIS APPPOOL accounts). The account does not require adminsitrator rights but does require these rights:
- Create Global objects.
- Log-on as a batch job.
- Log-on as a service.
Using the same account means the two processes; IIS Worker Process (w3wp.exe) and MeadCo ScriptX Broker/Host (mcsxhost80x64.exe) share access to the same account setup and printers. As an interactive account, the account can be logged into and problems with printer or content access can be analysed and debugged.
We start from a clean server with nothing installed, for example no IIS. You may already have compoments such as IIS and Web Deploy already installed and configured in which case review the requirements but otherwise skip ahead to installing ScriptX.Services for On-Premise Devices..
In order to successfully install ScriptX.Services for On-Premise Devices you must have good knowledge of the security envionment of your server.
Downloads
Each of the components required for ScriptX.Services for On-Premise Devices is available from MeadCo's Codestore.
We also prrovide links on this page to download the required components.
Install Internet Information Services (IIS)
If IIS has not been installed yet, then install it using Add Roles and Features of Server Manager, and choose Web Server:
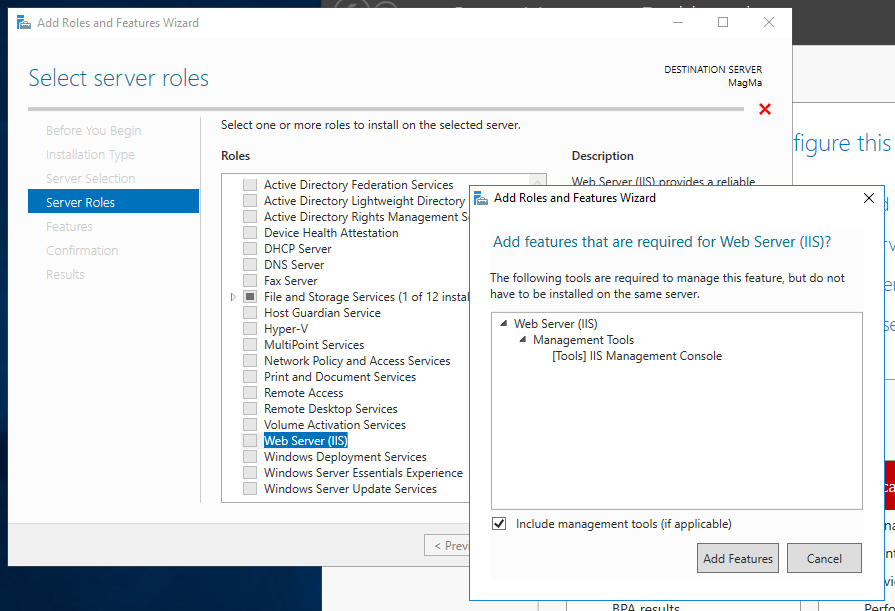
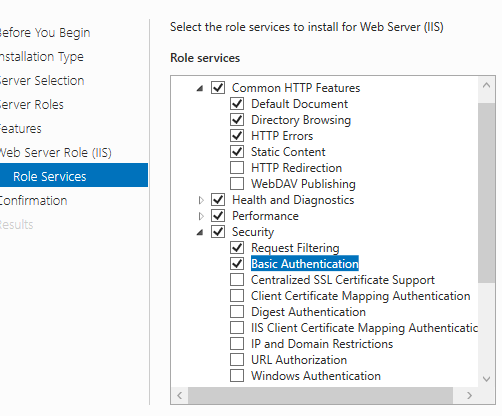
Configure the role services and ensure that Common HTTP Features: Static Content and Security: Basic Authentication are enabled:
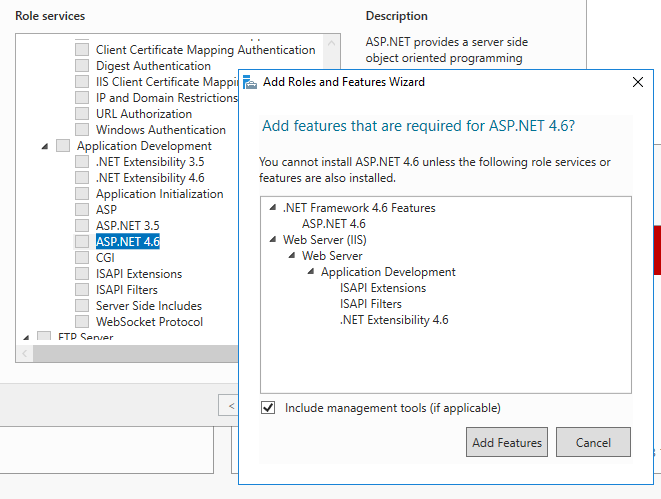
and finally in Application Development: ASP.NET 4.6 is enabled:
Now navigate to your server (e.g. http://localhost) to ensure that server is available and the default IIS home page is returned.

Install Web Deploy
Using Web Deploy is a convenient way of installing the ScriptX.Services WebApp. More details on Web Deploy are available in this article.
If Web Deploy is not already installed, then install from this page.
Install and Configure ScriptX.Services
The install of ScriptX.Services for On-Premise Devices requires installation of a web application and COM server and the creation of a user account and configuration of the COM server with the account.
Server Identity account
Create account
The ScriptX Print Server should run in the background and without the need for an interative account to be logged in. We recommend that an account is created for this whereby you can control the rights available to the account. The account should be a standard user account (i.e. not an administrator!) but will need some additional rights.
When using the Web Deploy based installer you must use the account name "ScriptXPrint".
If you wish to manually create the application within IIS then you can use a pre-existing account provided it has log-in as a service rights in which case skip ahead to Configure account rights
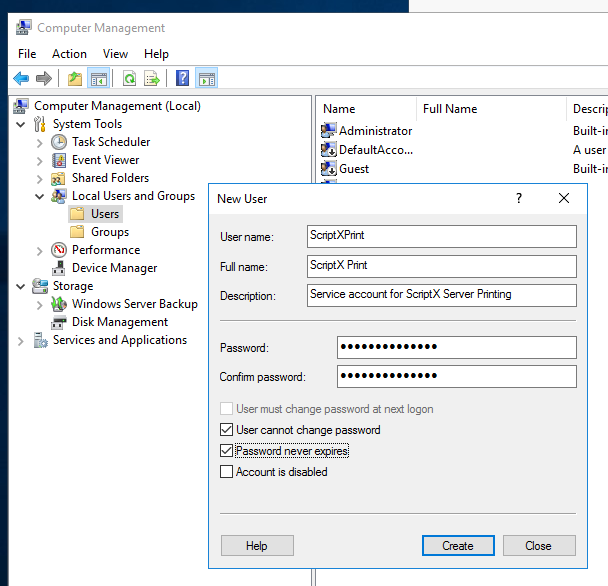
- From Server Manager Tools menu, select Computer Management.
- Navigate to System Tools, Local User and Groups and then Users.
- From the Action menu, choose New User ...
-
Complete the dialog, use the user name "ScriptXPrint".
Configure account rights
If desired/required, enable the account for remote log-in (Control panel | System | Allow remote access | Select users ...)
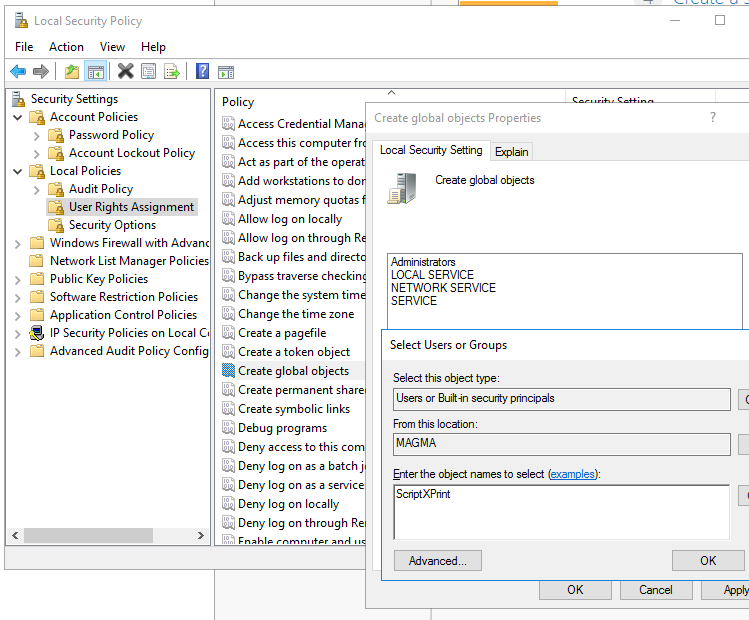
For licensing to work correctly, the account must have the right to Create global objects. To do this:
-
From Server Manager Tools menu, select Local Security Policy.
In the left pane, navigate to Local Policies then User Rights Assignment.
In the right pane, double click Create global objects.
-
Click Add user or group and add the user created previously:
Additional rights
Add the account to those with:
- Log on as a batch job.
- Log on as a service.
in a similar way.
Test and configure account
It is very important this step is completed so that the printing can work unattended.
Log in to the account.
Start IE, accept defaults for configuration and then set the default start page default to "about:blank".
Configure a default printer for account.
-
Ensure that the domains/urls from which content may be downloaded for printing (for example css and images files) can be navigated to without error.
Depending on your environment this may require that Enhanced Security Configuration is disabled.
The account will be configured as the Server Identity later in the installation sequence.
Install ScriptX Server
ScriptX Server provides pagination and printing services for the Web Application.
ScriptX Server
To download or upgrade to the latest version (10.4.15.4) of ScriptX Server:
-
Run the installer.
In order for the installer to run, you must be logged on to your computer as an Administrator.
Configure ScriptX Server DCOM Security and Launcher
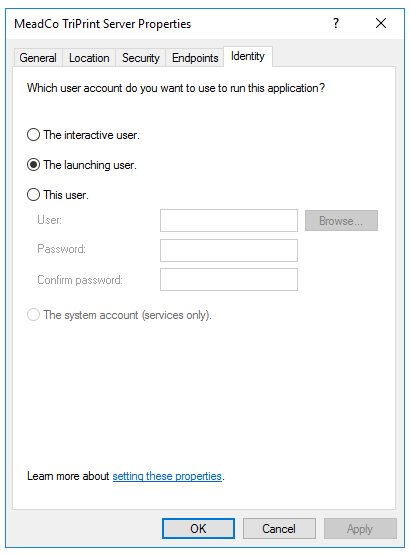
Later, we will configure the IIS worker process (w3wp.exe) to use a named account (possibly the one created previously, ScriptXPrint). The ScriptX Server process (mcsxhost80x64.exe) should run under the same account (in other words, the launching user).
Set the Server Identity Account
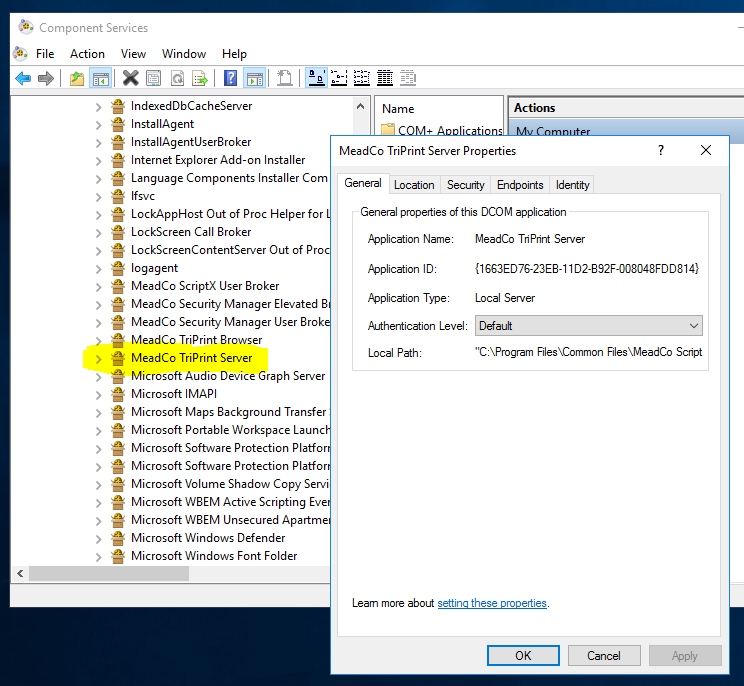
From Server Manager Tools menu select Component Services.
Navigate to Computers, then My Computer, then DCom Config.
-
Locate MeadCo TriPrint Server, right client and choose Properties from the menu:
-
Select the Identity tab and ensure the option "The launching user" is checked:
Set DCOM Security
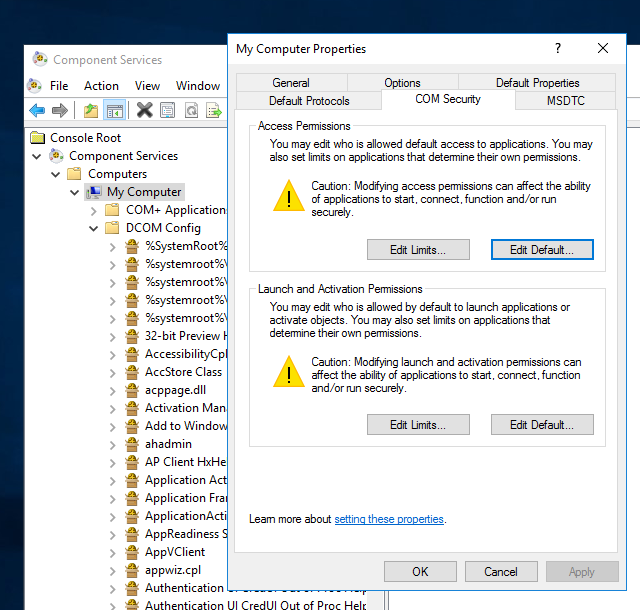
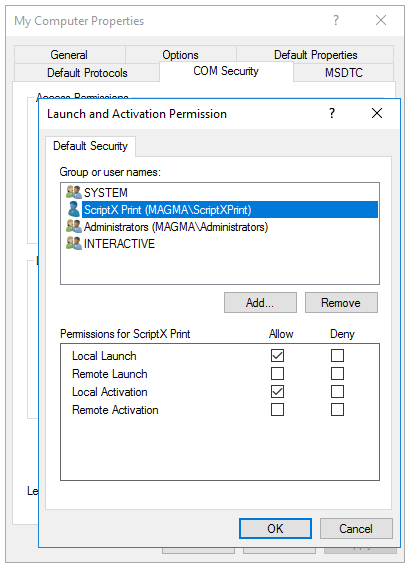
The account that will be used to run the IIS Worker Process (e.g. ScriptXPrint) must be given Launch and Activation permissions in DCOM. We recommend changing default COM Security.
From Server Manager Tools menu select Component Services.
Navigate to Computers | My Computer.
-
Right click the My Computer node and choose properties from the menu and then select the COM Security tab.
-
Click Edit Default for Launch and Activation Permissions and then add the acccount you indend to use (e.g. ScriptXPrint):
Install Profile Loader Service [optional]
The ScriptX Print Server will run in the background and without the need for an interative account to be logged in.
The server requires a full profile environment - configured folders for data download etc and available printers. When a server starts a profile is not automatically loaded for it - the profile must already be in use by a service.
We will configure the Web Application in IIS to load the required profile but you may wish to install a 'null' server that will cause the profile loading when the system starts. The service does nothing but sleep.
If you are using an account that is already used by a service then skip ahead to Install and Configure ScriptX.Services OnPremise App.
-
Run the installer.
In order for the installer to run, you must be logged on to your computer as an Administrator.
-
Choose a suitable location to install the service and then provide the required account:
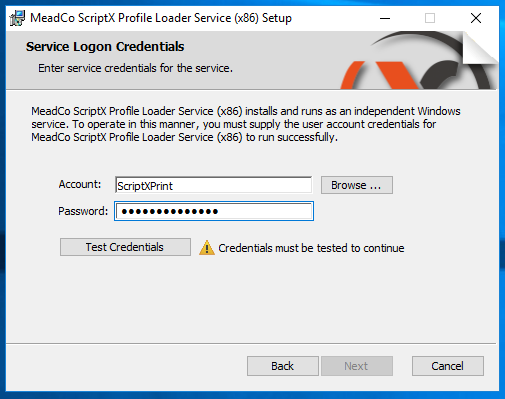
- Test you have provided the correct credentials for the account and then complete the installation.
Install and Configure ScriptX.Services for On-Premise Devices Web Application
The web application provides the REST API for clients and a dashboard for configuration and monitoring of services usage.
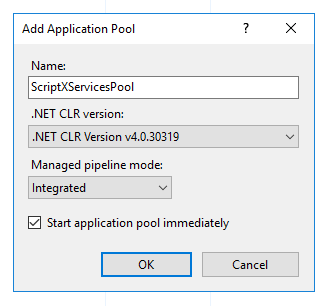
Create Application Pool in IIS
We recommend a new pool is created for the ScriptX.Services application named, for example, ScriptXServicesPool. The pool must use .NET CLR v4 in Integrated Pipeline mode:
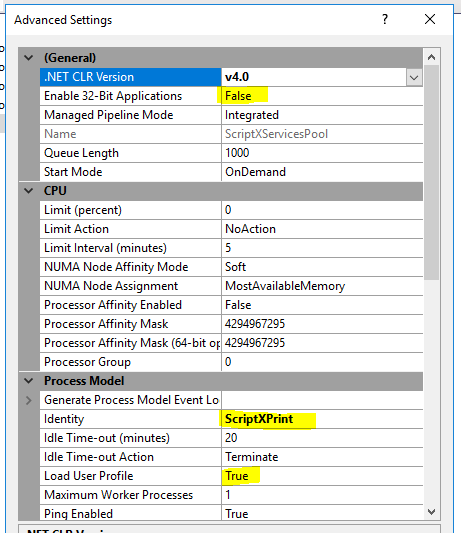
After creating the pool, edit "Advanced Settings..." for the pool and ensure:
- Enable 32bit applications is
False, and - Process model identity is changed from ApplicationPoolIdentity to Custom account and the account created earlier (e.g. ScriptXPrint), and
- Load User Profile is
True
Install the Web Application
To download or upgrade to the latest version (2.12.0) of ScriptX.Services for On Premise:
-
-
The downloaded package is a .zip file and should be Unblocked and then unpacked to a suitable folder on a hard drive.
-
Open an admin command prompt and cd to the folder created.
There are now two choices for installation - as an application in the default web site, or to a new site.
Install to an Application in the Default Web Site
This is the easiest install and will create an application named "ScriptXServices".
-
Use the command
OnPremserver.deploy.cmd /Y- the application will be created but will use the DefaultAppPool.. -
From Server Manager Tools menu select IIS Manager
-
Navigate to Sites\Default Web Site\ScriptXServices
-
Edit Basic or Advanced Settings ...
-
Select the pool created previously (ScriptXServicesPool)
-
In the admin command prompt, use the command
OnPremserver.deploy.cmd /Yagain. This will set the required permissions on the App_Data folder.
Install to a new Web Site
You may wish to create a new web site.
-
Create the site in the usual way and select the application pool created earlier (ScriptXServicesPool).
-
At the command prompt enter
onpremserver.deploy /y "-setParam:name='IIS Web Application Name',value='<YourSiteName>'"where <YourSiteName> is the name of the site you created.
Application installation and OS configuration complete
That completes installation and configuration of the ScriptX.Services components.
Restart the OS in order for DCOM changes to take effect (restart of IIS is not sufficient).
Once the server is restarted, the configuration application can be run.
Apply License, Configure and Test
The last step is to configure the server with your license.
In order to use ScriptX.Services for On-Premise Devices you will require a license. To evaluate ScriptX.Services On-Premise please order a license for your server. The license will be valid for 60 days to enable you to fully evaluate the functionality.
Please visit ScriptX.Services Pricing and Licensing to order a license.
After your order is processed you will be supplied with a License ID unqiue to you.
Navigate to the server with your browser. As the server is not yet configured, the server dashboard will start at the Configure server screen:
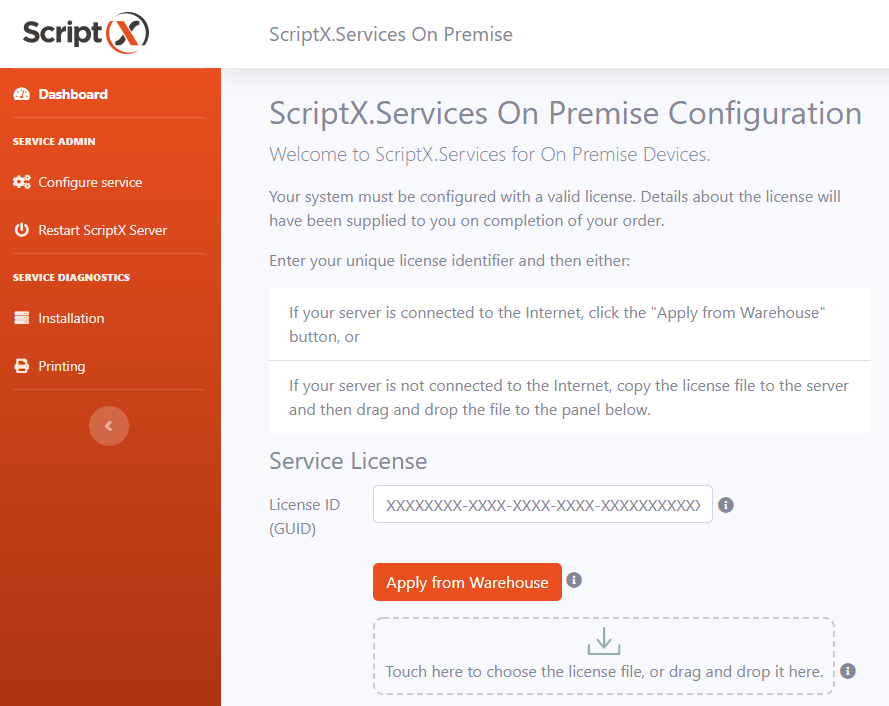
If your server is connected to the internet:
- Enter your license ID and click
Apply from Warehouse.
The license will then be downloaded, validated and applied to your server and the screen updated to show the details of the license and the printers that are available to the server.
If your server is not connected to the internet
Download the license file as described when the license was provided to you.
-
Copy the downloaded file to a suitable location on the server.
If necessary, navigate to the ScriptX.Services dashboard and select
Enter your license ID.
either:
-
drag and drop the license file to the active drop area on the page,

or,
-
click on the panel and use the file dialog to locate the file and upload it.
Configure available printers
By default the only printer available from ScriptX.Services for On-Premise Devices is the default printer of the configured Identity account for ScriptX Server.
Choose all the printers you wish to be available and then click Use these printers.
Test printing
After configuring the printers to be available, click `Print configuration` to send a printable version of the page to the default printer.
If printing fails, trouble shoot by using the Test configuration and Test printing facilities. All licensees are entitled to full technical support.
Also see:
How to configure options ScriptX.Services for On Premise Devices.
How to configure samples for use with ScriptX.Services for On Premise Devices.